Tuesday, April 18

Published 18 April by Admin with 0 comment

"Motion" What is Definition of Motion and How it's Work ?

Definition of Motion


When the earth rotates, all objects on the earth's surface also rotate. Tree and houses which look standing still also rotate. However, they are considered to be unmovable. Why so?  A rider rides on the highway. In this case, the man is considered to be movable. Why so?

Trees and houses are considered to be unmovable because the position is stable, while a driving rider is considered to be movable because the position change. For more details, look at the following case study.

A buss is leaving a bus station. The bus to be considered movable because the position toward the bus always change. In this case, the bus is avoiding the bus station. The passenger is also considered to be movable because the position toward the bus station also changes.

However, the passenger is considered to be unmovable toward another passenger sitting next to him/her. The passenger is considered to be unmovable because both positions do not change.An object is considered to be movable if the position toward a reference point changes.
Read More
      edit
Published 18 April by Admin with 0 comment

Dimension of Derivative Quantities and Additional Quantities in Physics

Dimension


Dimension of a quantity is a relation between that quantity and base quantities. Dimension of quantities shows how the quantities are arranged upon the base quantities. In physics, there are seven base quantities and that have dimension and two additional quantities that do not have dimension.

However all of derivative quantities have dimension. The dimension of derivative quantities can be found from the dimension of base quantities their derived from.

The dimension of base quantity is stated with capital letter or capital letter in square brackets. To find out, see table below. In that table, there are dimension of base quantity and additional quantities.

Table The Dimension of Base Quantities and Additional Quantities
Base QuantityUnitUnit AbbreviationDimension
Lengthmetrem[L] = L
Mass
kilogramkg[M] = M
Timeseconds[T] = T
TemperaturekelvinK[θ] = θ
Electric current ampereA[I] =I
Luminous intensitycandelacd[J] = J
Amount of substancemolemol[N] = N

Additional QuantityUnitUnit AbbreviationDimension
Plane angleradianrad-
Solid angle
steradiansr-

Problem Solving !


@ How to determine the dimension of a unit is as the following ?

1) Velocity dimension
Velocity = displacement / time elapsed
 [v ] = [L] / [T]
 [v ] = [L][T]-1 =L T-1

2) Force dimension
Force = mass x acceleration
[F ] = [M][L][T]-2 = M L T-2


@Dimension can be used to prove the similarity of two quantities and two determined the price of derivative quantites.

1) Proving the equivalence between work and quantities of kinetic energy

Work = force x distance
[W ] =  [M][L][T]-2[L]
          =  [M][L]2[T]-2
          = M L2 T-2

Kinetic Energy  = 1/2 m v2
 [E ] = =  [M][L][T]-2[L]
          =  [M][L]2[T]-2
          = M L2 T-2


2) Determining the unit of derivative quantities

Pressure = force / surface area

 P = F / A
[P ] =  [M][L][T]-2[L]-2
         =  [M][L]-1[T]-2
         =  M L-1 T-2

Hence, the unit of pressure is kg m-1 s-2.
Read More
      edit

Wednesday, April 12

Published 12 April by Admin with 0 comment

Using Tenfold Numbers in Mathematics and Physics

Nowadays, there are two system of units that people are usually used to; there are metric system and British system. Metric system is divided into two, they are CGS (centimeter, gram, and second) and MKS (meer, kilogram, and second). Example of British system of unit are pound, feet, and inch.

System International (SI) of unit  basically derived from metric system. Therefore, system international of unit are very easily converted (changed) from one unit to the others. The conversation are done by multiplication of tenfold numbers or ten or ten degree n (10n , with n is integer). For example, 1 km can be converted into 103 and 1 mm can be changed into 10-3 m.

To allow writing the unit using number that has many zeros. Both behind the number and zeros behind the coma, are written using ten that has degree. Number of ten is called multiplier factor. In SI, multiplier factor have their special names. 

For example : 
  • 2,000,000,000  = 2 x 10⁹
  • 0.000003  = 3 x 10⁻⁶
According to the system international of unit multiplier factor are presented in table

FactorInitial NameAbbreviation
10-12 picop
10-9 nanon
10-6 microμ
10-3 milim
10-2 centic
10-1 decad
100 -_
101 decada
102 hectoh
103 kilok
106 megaM
10-3 9gigaG

Example of the use of multiplier factor :
1 micrometer  = 1 x 10-16 metre
5 gigabytes     = 5 x 10⁹ bite
2 megahertz   = 2 x 10⁶ hertz
Read More
      edit
Published 12 April by Admin with 0 comment

Significant Figures : Addition, Substraction, Multiplication and Division of Significant Figures

Significant Figures


1. Addition and Substraction of Significant Figures


The result  of addition and substraction has only in questionable (quesstimate). If the entire numbers are not underlined, the last is the number in questionable.

For example :
  • Sampel 1
25300 g  (the 3 is in questionable)
  4140 g  (the 0 is in questionable)
______+
29440     ( it has two numbers in questionable)
Since the final result has to have one number questionable, that number is rounded into 29,400.
  • Sampel 2
152.227 cm  (the 7 is in questionable)
  22.5     cm   (the 5 is in questionable)
______+
174.727 cm  (the final result is rounded into 174,7 cm)
  • Sampel 3
523.467 cm 
  15.300 cm
______ -
508.167 cm  (is rounded into 508.2)
  • Sampel 3
430 g
255 g
______ -
175 g  (the final result is rounded into 180 g ; a number is questionable)

2. The Multiplication and Division of Significant Figures


Total significant figures resulting from the addition, subcraction, multplication, division or combination is as many as one of the significant figures that has the least significant figure. Else, the counting result can only have once number in questionable.


1) Multiplication


a) 2.35 cm x 2.4 cm  = 5.64 cm2
                                         = 5.6 cm2 (two significant figures)

b) 0.534 cm x 5.2 cm  = 2.7768 cm2
                                            = 2.8 cm2 (two significant figures)

c) 0.323 cm x 2.5 cm  = 0.8075 cm2
                                            = 0.81 cm2 (two significant figures)

d) 12.5 cm x 4.5 cm x 1.23 cm  = 69.1875 cm3
                                                             = 69 cm3 (two significant figures)

e) 16.40 cm x  4.5 cm x 3.26 cm  = 240.588 cm3
                                                                  = 240 cm2 (two significant figures)

F) Multiplication of significant figures with the definite numbers is describe as the following
      The thickness of a stone is 10.33 cm. If there are 17 stones arrange upright, the height of the arrangement is 10.33 cm x 17 = 175.65 becomes 175.6 cm (four significant figures)


2) Division


a) 52,500 g : 2.4 cm3  = 21,875g/cm3
                                            = 22,000
                                            = 2.2 x 10³ g/cm3 (two significant figures)

b) 13,550 dyne : 234 cm2  = 57.905983 dyne/cm3
                                                    = 58 dyne/cm3 (two significant figures)


3) Draw  the root of significant figures is as the following example


a) √625 cm  = 25.0 cm (three significant figures)

b) 3√78 cm  = 4.2726 cm
                         = 4.3 cm (two significant figures)

4) π (phi) number has value of 3.14159265


For physics counting, the total numbers behind the point from π number depends on the precision of the measuring tool.

a) Circumference of a circle the radius of  r = 12.35 is
 S = 2πr
    = 2 x (3.141) x (12.35)
 S = 77.58 cm (four significant figures)

b) Area of circle with the radius of 12.35 is
A = πr2
    = (3.141) x (12.35)2 = 479.07317 cm2
A = 479.1 cm2 (four significant figures)


Read More
      edit
Published 12 April by Admin with 0 comment

Round Numbers Rules : How to Write Round Numbers ?

Round Numbers Rules

Round Numbers Rules

Sometimes, measurements in physics result non-integer numbers. Hence, it is more practice and easier the counting process if the numbers resulting from the measurements is rounded. The rules of the rounding are as follows :

1) The number that is bigger than 5 is rounded up.
For example : 
  • 52.527 is rounded into 52.53
2) The number that is smaller than 5 is rounded down.
For example : 
  • 24.674 is rounded into 24.67
3) The number of exact 5 is rounded up if the number before it is uneven number and it is rounded down if the number before it is even.
For example : 
  • 24.235 is rounded into 24.24
  • 24.225 is rounded into 24.22

Read More
      edit

Friday, April 7

Published 07 April by Admin with 0 comment

Significant Figures Rules - How to Write Significant Figures ?

Significant Figures


Overview Significant Figures


Physics experiment cannot be separated from the numbers of measurement result. Most of the measurement result are in the form of fraction numbers (it is not integer). For example, when you are measuring a book you obtain the length of 29.7 cm and width of 21.6 cm. How wide is the surface of the book based on physics rule ?

Significant figures are the numbers obtained from the measurements result, including the last numbers predicted. Hence, the significant numbers consist of the real numbers and the appraisal numbers on the measuring tool used.

A. Different of Significant Figures and Exact Figures


Counting and measuring have different meaning. Counting results the exact figures. For example, count 125 apples in the basket. While measuring results significant figures, for example the measurement result of the length of something is 12.54 cm. Therefore, exact figure is the number obtained by counting.

While significant figures is the number resulting from measurement.the number of significant figures in the definite number is beyond the limitation, while significant figure in the measurement result on the precision of the measuring tool.

B. Process of Writing Measurement Result ( Significant Figures Rules)


To write measurement result, there are some rules that you need to consider. The rules mentioned are as the following.

1) All of number significant is significant figures except zero.

For example :
  • 432.4 cm ; 4.324 m  : it has four significant figures
  • 125.55 kg                        : it has five significant figures 
2) The zero which is in between the two significant figures is considered to significant figures

For example :
  • 35.05 m ; 3.505 cm : it has four significant figures
3) The zero which is behind the not-zero numbers and place in the last row is considered to be the significant figures, except in the number before the zero is underlined.

For example :
  • 1,250 g    : it has four significant figures
  • 12,50 kg  : it has four significant figures
  • 1,200 g    : it has four significant figures
  • 1,200 g    : it has three significant figures
4) The zero in front of the not-zero number, both in front of and behind the point, is considered not to be significant figures.

For example :
  • 0.25 cm   : it has two significant figures
  • 0.0025 g  : it has two significant figures
To make the writing and determined the significant figures easier, it is better if we use scientific notation. The writing that was many zeros, either behind the point or behind the significant figures, we use ten degree (10n , n is integer it is positive negative).

For example :
  • 12,000 = 12 x 103 = 1.2 x 10⁴ : there are two significant figures
  • 1.20 x 10⁴ : there are three significant figures
  • 1.200 x 10⁴ : there are four significant figures
  • 0.00024 x 10⁻⁵ : there are two ignificant figures


Read More
      edit
Published 07 April by Admin with 0 comment

How to Use and Read Ruler, Vernier Caliper and Micrometer Caliper ? - Length Measurement

Length Measurement


To measeure the length of a thing, you can use ruller, roll metre (pedometer), vernier caliper, or micrometer caliper. Can all of tools of length measurement be used to measure anything ? For example to measure the diameter of a wire can you use a ruler and to measure a length of a bench, can you use a vernier caliper ? To use measure a length of a thing, you have to choose the appropriate tool.


1. Ruler


To measure a length or wide a book, you can use a ruler. There are two kinds of scales in a ruler; there are milimetre (mm) for small ruler and centimetre (cm) for a ruler with 1 metre length or in pedometer. The accuracy of measurement using ruler is 0.5 mm.

This value is obtained from a half the smallest scale on the ruler that is 1 mm. To measure a length of ground, a yard, or road, we use pedometer that have the smallest scale of 1 cm. It means that the precision of the pedometer is 0.5 cm.


2. Vernier Caliper


vernier caliper - length measurement
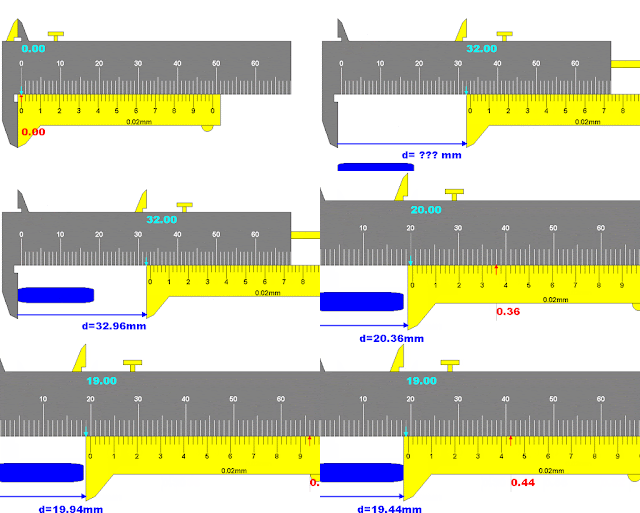
In craftmanship or machinery, the use of vernier caliper is very important. To measure the diameter of  a pipe, both inside diameter and outer diameter, it will be appropriate if you use vernier caliper. There are two kinds of vernier caliper that you can meet in markets, they are vernier caliper with the precision of 0.1 mm and 0.05 mm. Vernier has two important parts, they are
  1. Fixed jaw, it has the main scale (in cm)
  2. Sliding jaw, it has vernier scale (in mm)

 
For vernier caliper with the precision of 0.1 mm, the length of vernier scale is 9 mm divided into 10 parts. Beside the vernier caliper with the precision of 0.1 mm, people also use the vernier caliper woth the precision 0.05 mm. On this kind of vernier caliper, the length of vernier scale is 39 mm, divided into 20 scale.


How To Use Vernier Caliper

 
The result of measurement using vernier caliper with the precision of 0,1 mm shown above is
  • Main scale = 2.4 cm
  • Vernier Scale = 0.07
  • Measurement Result = 2.47


3. Micrometer Caliper 

To measure the thing with precision of 0.01 mm, we use micrometer caliper. Tool that is used to measure the thickness of a paper, slight metal, or diameter of wire is micrometer caliper.


How to Use Micrometer Caliper

Put the thing you want to measure between the sliding jaws, next turn the big turning until both jaws touch the thing. And then, turn the small turning until the number in the vernier scale  (big turning) cannot shift again. Then result can be obtained by reading the number in the main scale added by the number in the turning scale. 


Read More
      edit
Published 07 April by Admin with 0 comment

Error of Measuring ? 5 Aspect of Measurement

Overview Error of Measuring

Error of Measuring - Aspect of Measurement

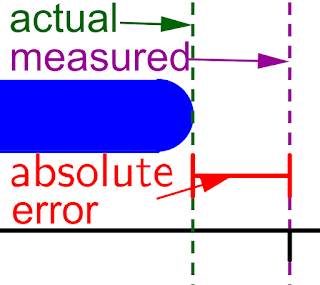
When observing or measuring something, it's very common if there is an error measuring. It can happened because of the influence of internal factor or external factor. Internal factor is factor comes from the observer. In addition external factor is factor comes from outside the observer. Besides, even though they way of reading and measuring tool used are the same, the reading result between one student and other can be different.

When you are measuring a certain tool, you want the most thorough measurement result. Some factors influences the measurement result are the position when you are reading the scale, ability of tool, the technique of the using tool and other influencing environments factors, for example temperature and air pressure.

The best position of reading the scale is perpendicular. On the contrary, reading with the position of eyes leaning to the scale or the showing pin will cause the error reading. The mistake mentioned above is the measurement which bigger or smaller than the real measure. The mistake caused by incorrect scale reading is called parallax error.

5 Aspect of Measurement

Error of Measuring - Aspect of Measurement

In using measuring tool, you have to understand the characteristic of the tool. This objective is mean that you can obtain the perfect measurement result. There are any aspect that people attention needed in measurement, they are accuracy aspect, precision aspect, sensitivity aspect, mathematic aspect  that need calibration, and random errors.

1. Accuracy


One day you are measuring a width of a table of tennis table. To obtain the accurate measurement, you need to measure repeatedly. Based on the measurement result, you will find some different scale reading although in small scale. If all the measurement result the more some value, whereas other value have a little different with the value, it means that you measurement have good accuracy.

2. Precision


The precision of measurement result have the close relationship with the tool you use. The precision is defined as the equation between result and the real size. The real size is a result which is considered as the correct measure based on thee reality. Therefore, in measuring something the closer you result to the real size, it means that your tools you use have the better accuracy.

However, if there is different between measurement result and the real size, it is caused by factors of tool, including systematic mistakes.

3. Sensitivity


One day, you had a task from physics teacher to measure the mass of a chalk. You were given two pair of scales, A and B. For example, based on pair of scale A, you obtained 10 grams, whereas using B, you obtained 10,2 grams. It means that B had the better sensitivity than A. Sensitivity is measurement of relative ability of a tool compared with the similar other tool.

4. Mathematics Error


In an experiment or observation, the tools those are used can give you the fake measurement result. It might be happened since the weakness of the tool or the shift or the zero position leveling on the tool. The mistake caused by the shift or the movement or the zero position on the tool are called mathemtics mistake. Therefore, before using the tool, you need to reset the zero position of the leveling.  

5. Random Errors


If you are measuring resistance of the resistor using an old multimeter, of course the result is not appropriate with the real size. Don't you realize that before ? This kind of measuring mistake is called random error. Random error is a mistake that happen incidentally and we cannot figure it out immidiately, for example
  • Fluctuation of the voltage (up and down) can damage the electricity tool
  • Background radiation
  • Vibrations around the measurement site
  • Other disturbance un predicted before
Beside the above mistake, there are also mistake caused by limited ability and skill of the observer. Since there are many source that cannot be overcome, thing that might be done by observer is minimizing those mistakes.


Read More
      edit